When enabled, this option accelerates window refresh under OpenGL if, for example, you move an undocked manager over the viewports. If the option is disabled, OpenGL must refresh the entire screen each time.
Tip:
Some OpenGL cards do not support Smart Window Refresh and will display errors if this option is enabled.
Smart Live Selection
If this option is enabled, live selection under OpenGL is accelerated — only the selected polygons or points are redrawn, rather than the entire screen.
Tip:
Some OpenGL cards do not support Smart Live Selection and will display errors.
Textures
Use Textures
This option defines whether textures can be displayed in the viewport.
This setting is applied globally, i.e. it affects all viewports. You can define this option separately for each viewport using the viewport settings, which apply to the active viewport only.
Texture Interpolation
Texture Interpolation controls which method is used to interpolate the textures when you zoom objects in the viewport: Nearest or Linear. Nearest uses the color of the nearest pixel in the texture, causing hard transitions in the zoomed texture. Linear uses linear gradients (i.e. linear interpolation) to create smooth or blurry transitions in the zoomed texture.
Texture Interpolation set to Nearest (top right) and Linear (bottom right).
Back Image Mode
If you have loaded a back image in the viewport settings, when you zoom in the viewport the back image will also be zoomed. Back Image Mode defines which type of interpolation is used for the back image. Try each mode and use that one that gives the best result.
Extensions
These settings enable you to optimize OpenGL for CINEMA 4D. The best settings depend on your system’s hardware and drivers. Try each option to find out which settings work best.
Active Object Plane
Highlight Plane
These options speed up the movement of objects and refresh rate of the highlight plane (the yellow highlighting that appears when the mouse pointer is over polygons in polygon mode). Only relevant parts of the screen will be redrawn; complex background areas may not have to be redrawn.
Up to three internal planes are created depending on which of the two options are enabled:
Both options disabled
Uses a single plane that should work with any graphics card.
Active Object Plane enabled, Highlight Plane disabled
Two planes are created. The second plane is used exclusively to redraw the highlighting.
Both options enabled
Three planes are created. The active objects are drawn on the second plane; the highlighting is drawn on the third plane. Depending on which view you are working in, only the relevant plane must be updated, which naturally provides a faster viewport refresh.
Use ARB Extension For Dual Planes
This option switches to an alternative method for displaying dual planes. Depending on the hardware, this method may provide a faster viewport refresh.
The option will be ghosted if it is not supported by your graphics card’s driver.
Enhanced OpenGL
Left: Editor view with Enhanced OpenGL. Right: Rendered. Notice the shadow casting, translucency, bump maps and normal mapping for the sphere on the right!
When in this mode numerous relevant material channels and lighting properties can be displayed fluidly in the editor view without having to render the image.
This option works globally. Enhanced OpenGL can be activated separately in each view (Display menu) also with regard to effects such as shadow, transparency, etc. (of course, these must be set to global as well).
Tip:
Enhanced OpenGL, including corresponding options such as transparency, shadow and post effect must be activated in the respective view (Display menu). CINEMA 4D supports OpenGL post effects (e.g. the Cartoon Renderer post effect) only to a limited degree.
Don’t expect miracles, though. Of course it is impossible for any graphics card to display all CINEMA 4D lighting or material properties (current graphics cards just are not capable of this type of performance) and there is no guarantee that the OpenGL display in the editor view will reflect the actual rendered result (OpenGL and CINEMA 4D renderers simply differ too greatly from one another). Enhanced OpenGL serves primarily to offer instant visual feedback for everyday situations without having to constantly test-render your scene, in particular with regard to the depiction of shadows (only Hard Shadows will be displayed; Parallel and Infinite shadows will not be displayed).
Tip:
Make sure you always use the most current driver for your graphics card.
The following properties are, for the most part, supported and can therefore be seen directly in the editor view:
Material channels: Color, diffusion, luminance, transparency, environment, bump, normal, alpha, specular, specular color (these can be activated / deactivated in the Illumination channel, exclusively for Enhanced OpenGL display.
Light sources: The most important options will be implemented (e.g. type, inner angle, outer angle (Spot Light), a Spot Light’s color gradient (Details tab: Use Gradient).
Shadows: Hard Shadows only (any shadow type can be selected; Parallel and Infinite shadows will not be displayed). All other shadows will only be displayed as Hard Shadows. Inaccurate shadow depiction can result when working with larger scenes.
Shaders: Many shaders will be calculated natively by the graphics card (color gradient (without 3D turbulence), fresnel, bitmap (i.e. loaded textures), color, karo, noise (exception: all Veronis, Ober and Zada) falloff, etc.), which will result in a relatively accurate depiction of the scene in the editor view. Other shaders such as noise, etc. will be emulated: Internally, the (relatively small) shader preview (bitmap) will be used and projected onto the object with UVW projection. These bitmaps will be saved with the scene, which can result in vastly larger (scene) file sizes!
Tip:
Tip:
If the Noise shader’s Space setting is set to UV (2D), the scene as displayed in the editor view will closely resemble the rendered result.
Note:
Since this functionality emulates shaders, opening a scene that contains many shaders can require a lot of memory.
Note 2:
Enhanced OpenGL also supports the Render As Editor and Make Preview functionalities which let you quickly create high-quality preview movies.
OpenGL Hardware Lighting
If you enable this option, your graphics card will take over the task of lighting the objects in the scene. This will usually give you a faster refresh rate in the viewport, depending on the performance of your graphics card.
OpenGL hardware lighting supports the following features only:
Environment object
Environment Color
Fog (3D view only)
Light source objects
Omni, Spot, Distance and Parallel lights
Color, Brightness
No Diffuse option, No Specular option
Up to eight lights are supported
Materials
Specular, inc. Width and Height
Specular Color
Texture in the Color channel with Specular highlights
Shared Textures
If this option is enabled, OpenGL will load a single texture for all views. Otherwise, a separate texture will be loaded for each view (this will use more memory but is more compatible).
Use Line Polygons
Enable this option for faster wireframe display. It affects wireframe display only.
Use OGL Points For Handles
Enable this option for faster display of object points (the points that are displayed when you select the Points tool). Some graphics cards do not support this feature.
Antialiased Lines
If this option is enabled, lines are smoothed (antialiased) by the OpenGL implementation provided the mode is supported.
Rotate Quads
A quadrangle is made up of four points: A, B, C and D. This can be broken down into the triangles ABC/ACD or ABD/DBC. CINEMA 4D uses the first variant. The variant used by OpenGL depends on the driver. If you notice display artefacts, try toggling the option to adapt the OpenGL display to the internal algorithms.
Rotate Quads disabled (left) and enabled (right). With some graphics cards it’s the other way around.
Maximum Trasparency Depth
Use this setting to define the maximum number of transparent polygons that can be displayed behind each other. Higher values will lead to slower display times. A value of 0 will antialias the transparency.
Maximum Light Sources
Use this setting to define the maximum number of light sources Enhanced OpenGL will calculate (in the order in which they appear in the Object Manager). Higher values will lead to slower display times.
Maximum Shadows
Use this setting to define how the shadows of light sources are displayed (in the order in whch they appear in the Object Manager). A value of 0 will result in no shadow being displayed.
Tip:
Note:
Depending on the light source, a maximum number of six shadows (Spot Light) or two shadows (Target Light) per object in the editor view can be displayed. The number of shadows that can be displayed may also be reduced if large materials are used (activated bump channels, shaders that use UVW-coordinates, etc.).
Compiler
You can select from two options that internally control the OpenGL applications. Use the option that works best with your particular graphics card.
The advantages and disadvantages of using each option in brief:
GLSL: Faster than Cg. However, each time you update your graphic card’s driver compiler errors can occur, resulting in flawed editor view displays.
Cg: Slower than GLSL but more stable and the compiler is not affected any driver updates.
Software Shading
Use Textures
This option defines whether textures can be displayed in the viewport.
The setting is applied globally, i.e. it affects all viewports. You can define this option separately for each viewport using the viewport settings, which apply to the active viewport only.
Tip:
You can work more smoothly in the viewports if you disable this option.
Perspective Correction
If this option and Use Textures are enabled, the material previews will be corrected for perspective in the viewports.
Colors
Use this page to define the colors used in the viewports. Select the element whose color you want to change from the list and pick the new color using the sliders or system color dialog.
You’ll see either three color sliders or a color table depending on the Color System setting on the Units page. The color preview is displayed to the left of the sliders.
If you click on this color box, the system color dialog will open.
If you click the triangle button below the color box, a menu appears. Use this menu to change the color model or to switch to the color table. This setting is retained for as long as the dialog is open. As soon as you close the dialog, the setting on the Units page is used once more.


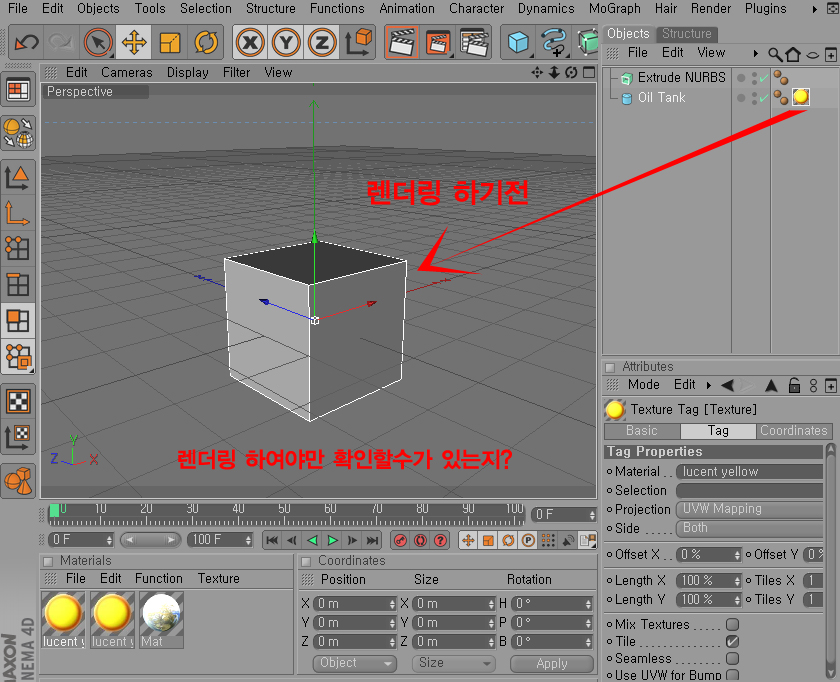


그외에것은 랜더링을 하셔야 겠지요.
좀더많은 디스플레이영역을 원하신다면 비디오카드를 100만원대 쿼드로에 맞추셔도 좋을겁니다